IPv6 is not currently available for cPanel hosting accounts.
Category: Domains & DNS
-
How should my MX records be configured?
When using external email hosting, you should configure your MX records as follows:
Record Type Name Priority Destination MX yourdomain.uk 0 mail.yourdomain.com A mail.yourdomain.uk – Your Shared IP Address Learn how to find your shared IP address.
Remember to add a TXT record for SPF, so your emails are authenticated:
Record Type Name Content TXT yourdomain.uk v=spf1 include:relay.zumedns.com ~all -
How to set the Reverse DNS (RDNS) for my Dedicated IP?
You must create an A record first to forward-confirm the RDNS record.
If you have purchased a dedicated IP, you can customise the reverse DNS record by opening a ticket. Please include the IP address and a Fully Qualified Domain Name (FQDN).
-
What is your IPS Tag?
Before changing your .uk domain’s IPS tag, you must place a transfer order first and wait for an order confirmation email.
To transfer your .uk domain, you should set its IPS tag to:
ZUMEIOThe transfer will then complete within a couple of hours.
-
How to Transfer a .uk Domain to Zume
Transfer your .uk domain to Zume, an Nominet-accredited registrar. Transferring a .uk domain is slightly different from transferring other domain extensions. The .uk domain uses a TAG system instead of auth codes. In this article, we’ll guide you through the steps to transfer your .uk domain to Zume for free.
The process for transferring domains without a .uk ending is different
If you want to transfer a non-.uk domain to Zume, please follow our guide on how to transfer a domain to Zume.
Zume’s Nominet TAG
Zume is a Nominet-accredited registrar. This means that we’re an official registrar for .uk domains.
Our Nominet TAG is ZUMEIO.
ZUMEIOTo transfer your .uk domain to Zume, you’ll need to update the TAG to ZUMEIO. There is no concept of domain transfer-locking or EPP codes for .uk domains.
Retagging a .uk should be free
Registrars are obliged to retag domains promptly, though they might charge for this. Despite costing them nothing, if your registrar plans to charge, we suggest going directly to the .uk registry, Nominet Online Services, and paying them £10 + VAT.
This has two perks:
- Immediate action
- It may discourage charging for leaving, which we deem unethical. If not, at least your current registrar won’t profit from your exit.
Enough with the formalities, let’s get started with the transfer process!
- Inform us about the transferYou should place a free transfer order with us before you change the TAG. This will ensure we know who to assign the domain to once it arrives, so it doesn’t get detagged and lost in the system!
- Log into the Zume client area.
- Go to the Transfer Domains to Us page.
- Enter your domain name in the provided field and click the Check Availability button. If your domain is available for transfer, you’ll see a message stating that it’s available.
- Leave the EPP code field empty and click the Add to Cart button to add the domain to your cart.
- Click the Continue button to proceed to the checkout page.
- Complete the checkout process to initiate the transfer.
- Request the TAG change with your current registrarNow contact your current registrar and ask them to update the IPS TAG to ZUMEIO on the domain you are transferring.
- Wait for the Transfer to Complete.uk domain transfers are usually completed within 1 hour of the TAG change. You can check the status of your transfer from your Zume client area.
- Log into the Zume client area.
- Go to the Domains page.
- View the status of your transfer.
- Update Your NameserversOnce the transfer is complete, you’ll need to update your domain’s nameservers to point to your hosting provider. You can do this from your Zume client area.View our guide on how to update your domain’s nameservers to Zume’s so your domain automatically works with your hosting plan.
- Log into the Zume client area.
- Go to the Domains page.
- Click the Manage Domain button next to the domain you want to update.
- Click the Nameservers tab.
- Enter your nameservers in the provided fields.
- Click the Change Nameservers button to save your changes.
-
How to Transfer a Domain to Zume
Transferring your domain to Zume is a straightforward process. In this article, we’ll guide you through the steps to transfer your domain to Zume from another registrar.
The process for transferring a .uk domain is different
If you want to transfer a .uk domain to Zume, please follow our guide on how to transfer a .uk domain to Zume.
Domains registered within the last 60 days cannot be transferred
Please note that domains registered within the last 60 days cannot be transferred due to ICANN regulations. If your domain was registered within the last 60 days, you’ll need to wait until the 60-day period has passed before you can transfer it to Zume.
- Prepare Your Domain for TransferBefore you can transfer your domain to Zume, you’ll need to prepare it for transfer at your current registrar. Follow these steps to prepare your domain:Unlock Your DomainUnlock your domain. If your domain is locked, you’ll need to unlock it before you can transfer it. You can usually do this from your domain registrar’s control panel.
- Unlock your domain at GoDaddy
- Unlock your domain at Namecheap
- Unlock your domain at 123-reg
- Unlock your domain at Google Domains
- Unlock your domain at Name.com
- Unlock your domain at HostGator
- Unlock your domain at Bluehost
- Unlock your domain at DreamHost
- Unlock your domain at Hostinger
- Unlock your domain at Fasthosts
- Unlock your domain at 1&1
- Obtain your EPP code at GoDaddy
- Obtain your EPP code at Namecheap
- Obtain your EPP code at 123-reg
- Obtain your EPP code at Google Domains
- Obtain your EPP code at Name.com
- Obtain your EPP code at HostGator
- Obtain your EPP code at Bluehost
- Obtain your EPP code at DreamHost
- Obtain your EPP code at Hostinger
- Obtain your EPP code at Fasthosts
- Obtain your EPP code at 1&1
- Initiate the TransferOnce you’ve prepared your domain for transfer, you can initiate the transfer from your Zume client area. Follow these steps to initiate the transfer:
- Log into the Zume client area.
- Go to the Transfer Domains to Us page.
- Enter your domain name in the provided field and click the Check Availability button. If your domain is available for transfer, you’ll see a message stating that it’s available.
- Click the Add to Cart button to add the domain to your cart.
- Click the Continue button to proceed to the checkout page.
- Complete the checkout process to initiate the transfer.
- Wait for the Transfer to CompleteOnce you’ve approved the transfer, you’ll need to wait for it to complete. The transfer process can take up to 7 days to complete, depending on your domain registrar. You can check the status of your transfer from your Zume client area.
- Log into the Zume client area.
- Go to the Domains page.
- View the status of your transfer.
- Update Your NameserversOnce the transfer is complete, you’ll need to update your domain’s nameservers to point to your hosting provider. You can do this from your Zume client area.
- Log into the Zume client area.
- Go to the Domains page.
- Click the Manage Domain button next to the domain you want to update.
- Click the Nameservers tab.
- Enter your nameservers in the provided fields.
- Click the Change Nameservers button to save your changes.
- Prepare Your Domain for TransferBefore you can transfer your domain to Zume, you’ll need to prepare it for transfer at your current registrar. Follow these steps to prepare your domain:Unlock Your DomainUnlock your domain. If your domain is locked, you’ll need to unlock it before you can transfer it. You can usually do this from your domain registrar’s control panel.
-
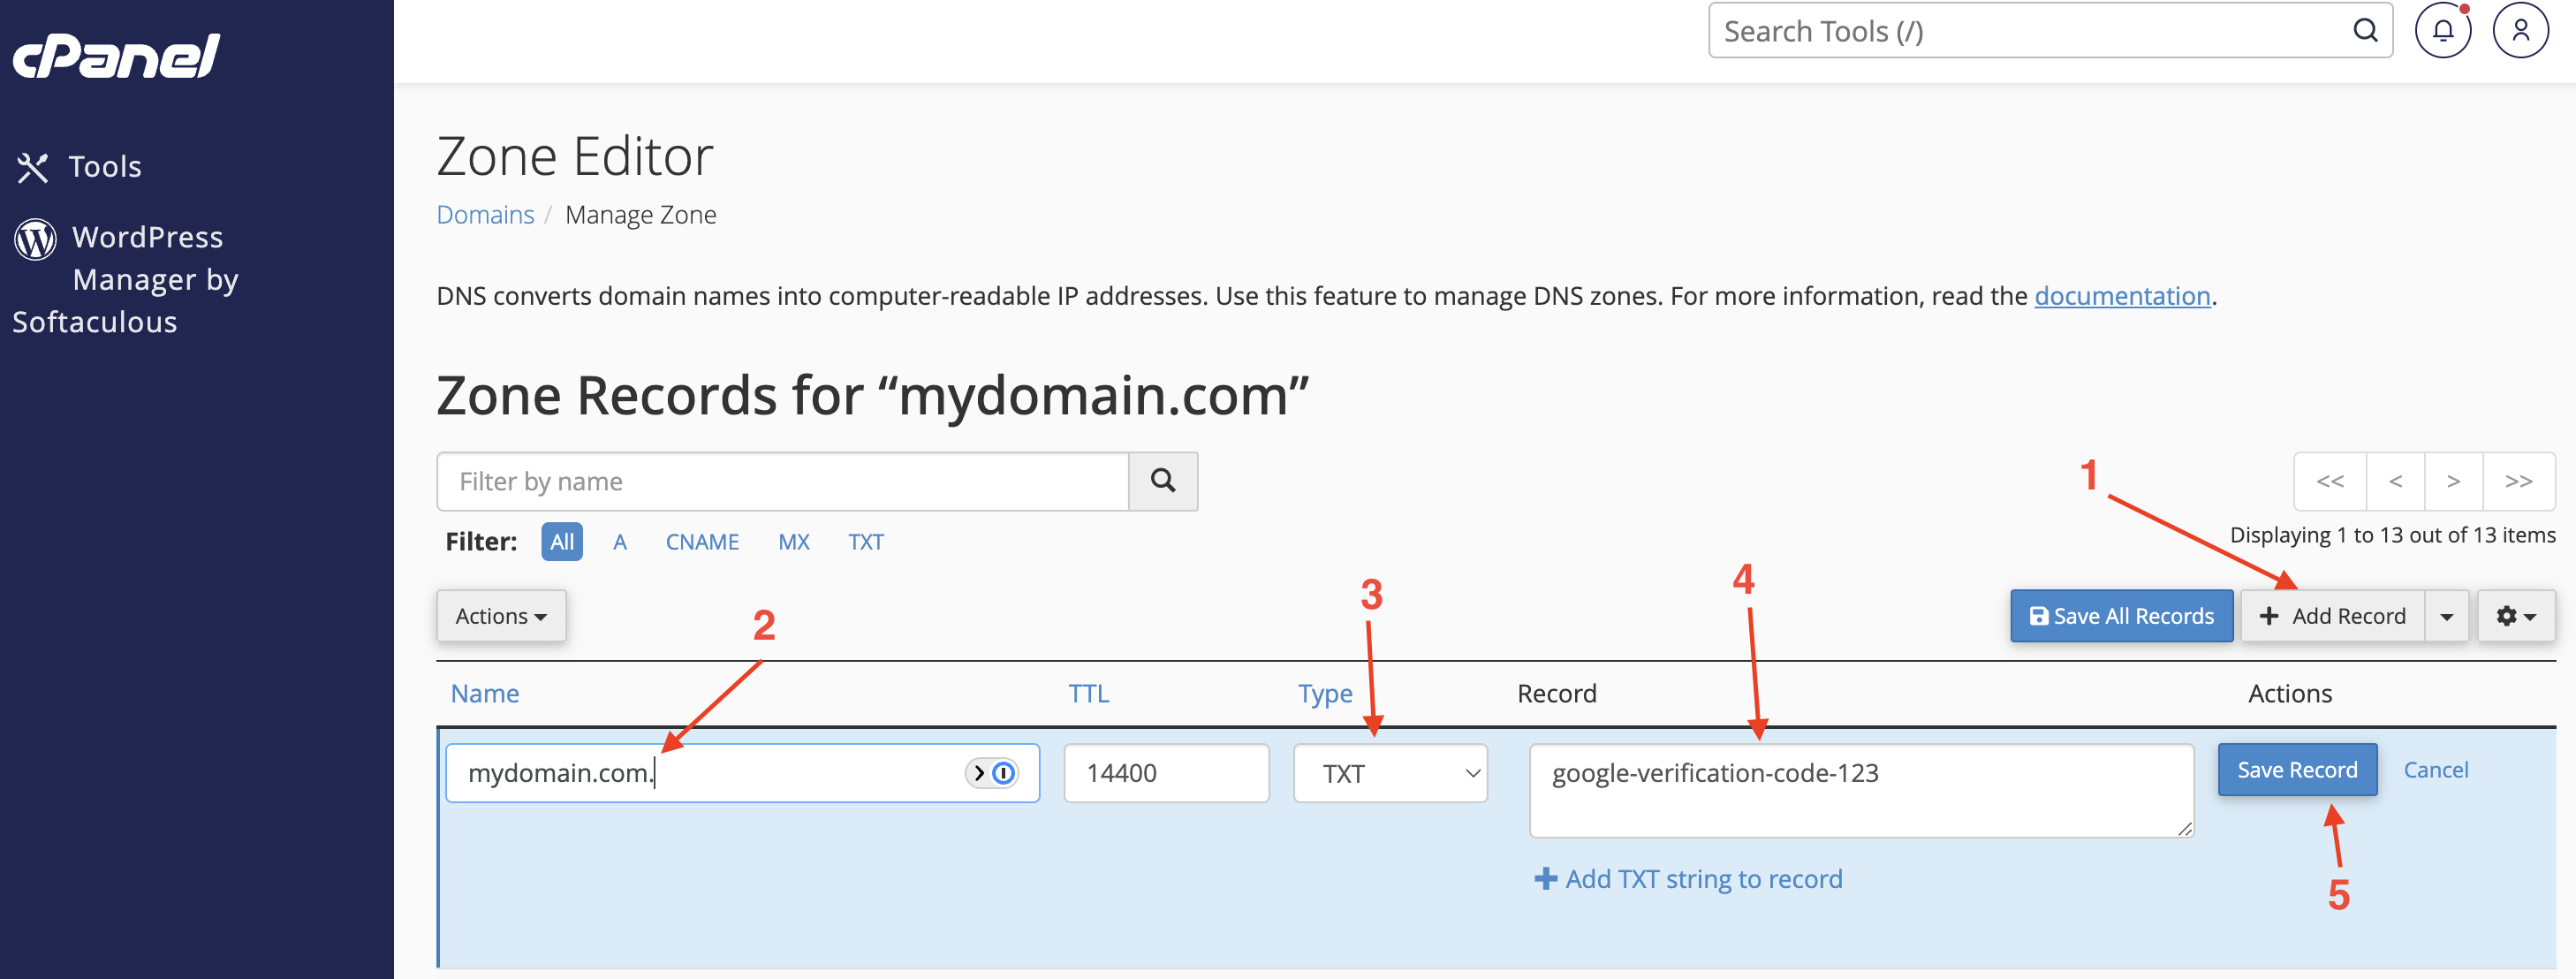
How to add a DNS Record in cPanel with the Zone Editor
Somtimes you may need to add a DNS record to your domain in cPanel, for example to set up Google Workspace or verify your domain with a third-party service. In this guide, we will walk you through the steps to add a DNS record in cPanel.
- Log in to cPanelLog in to your cPanel account using your credentials.
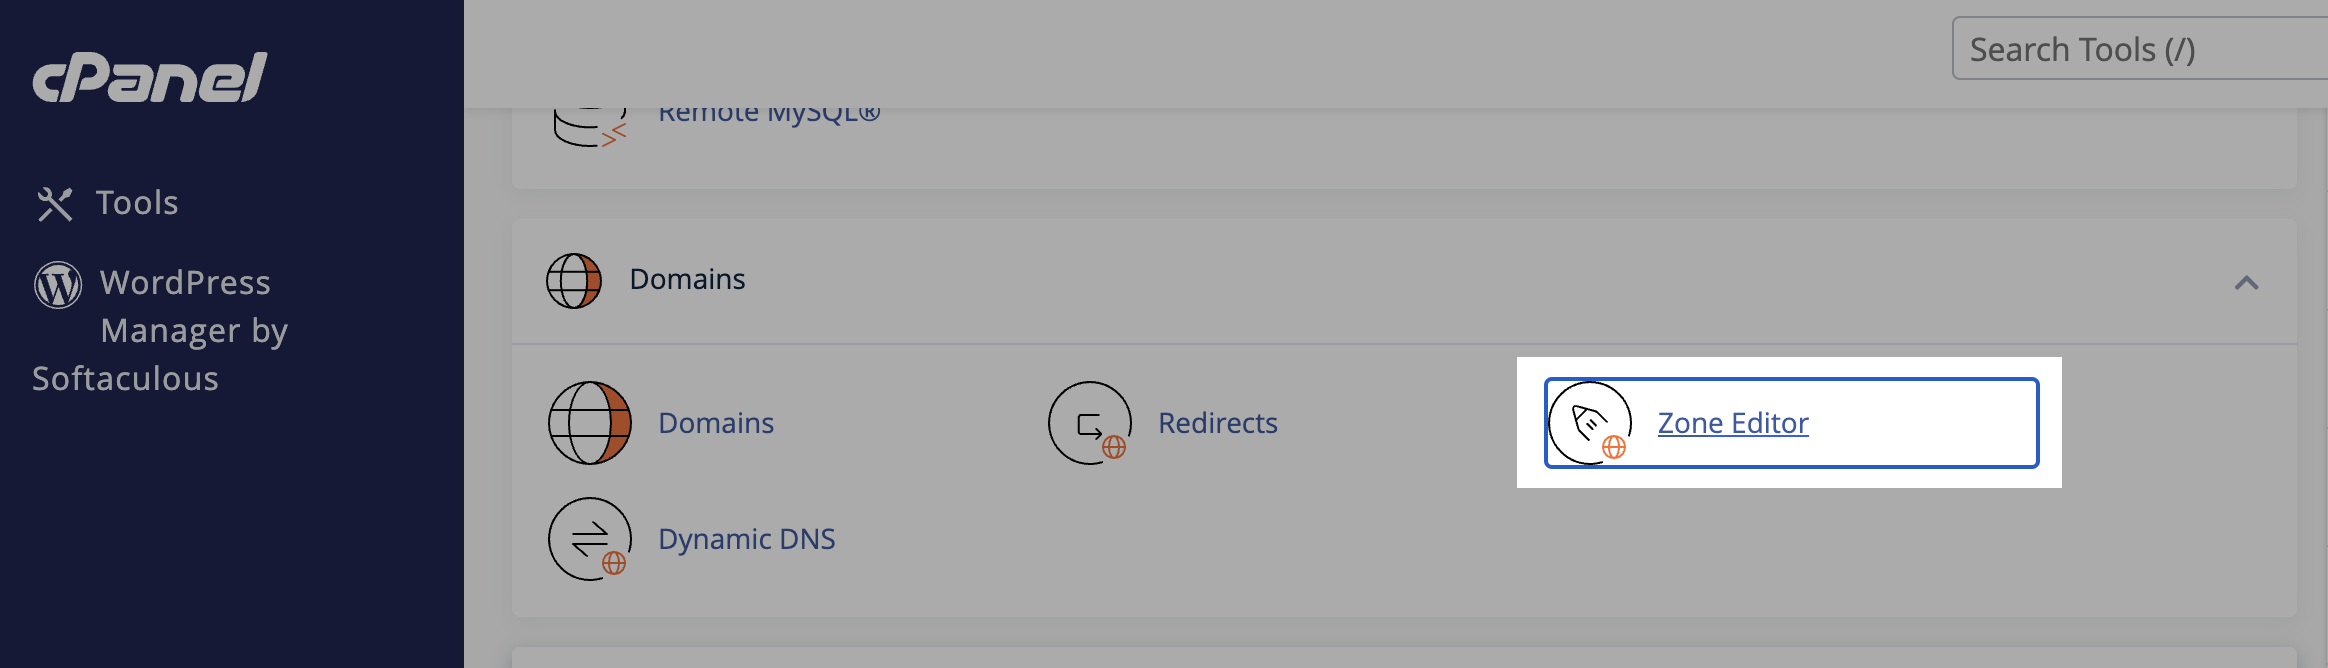
- Go to the DNS Zone EditorIn the cPanel dashboard, navigate to the “Domains” section and click on “Zone Editor.”
 Find your domain in the list of domains and click on “Manage.”
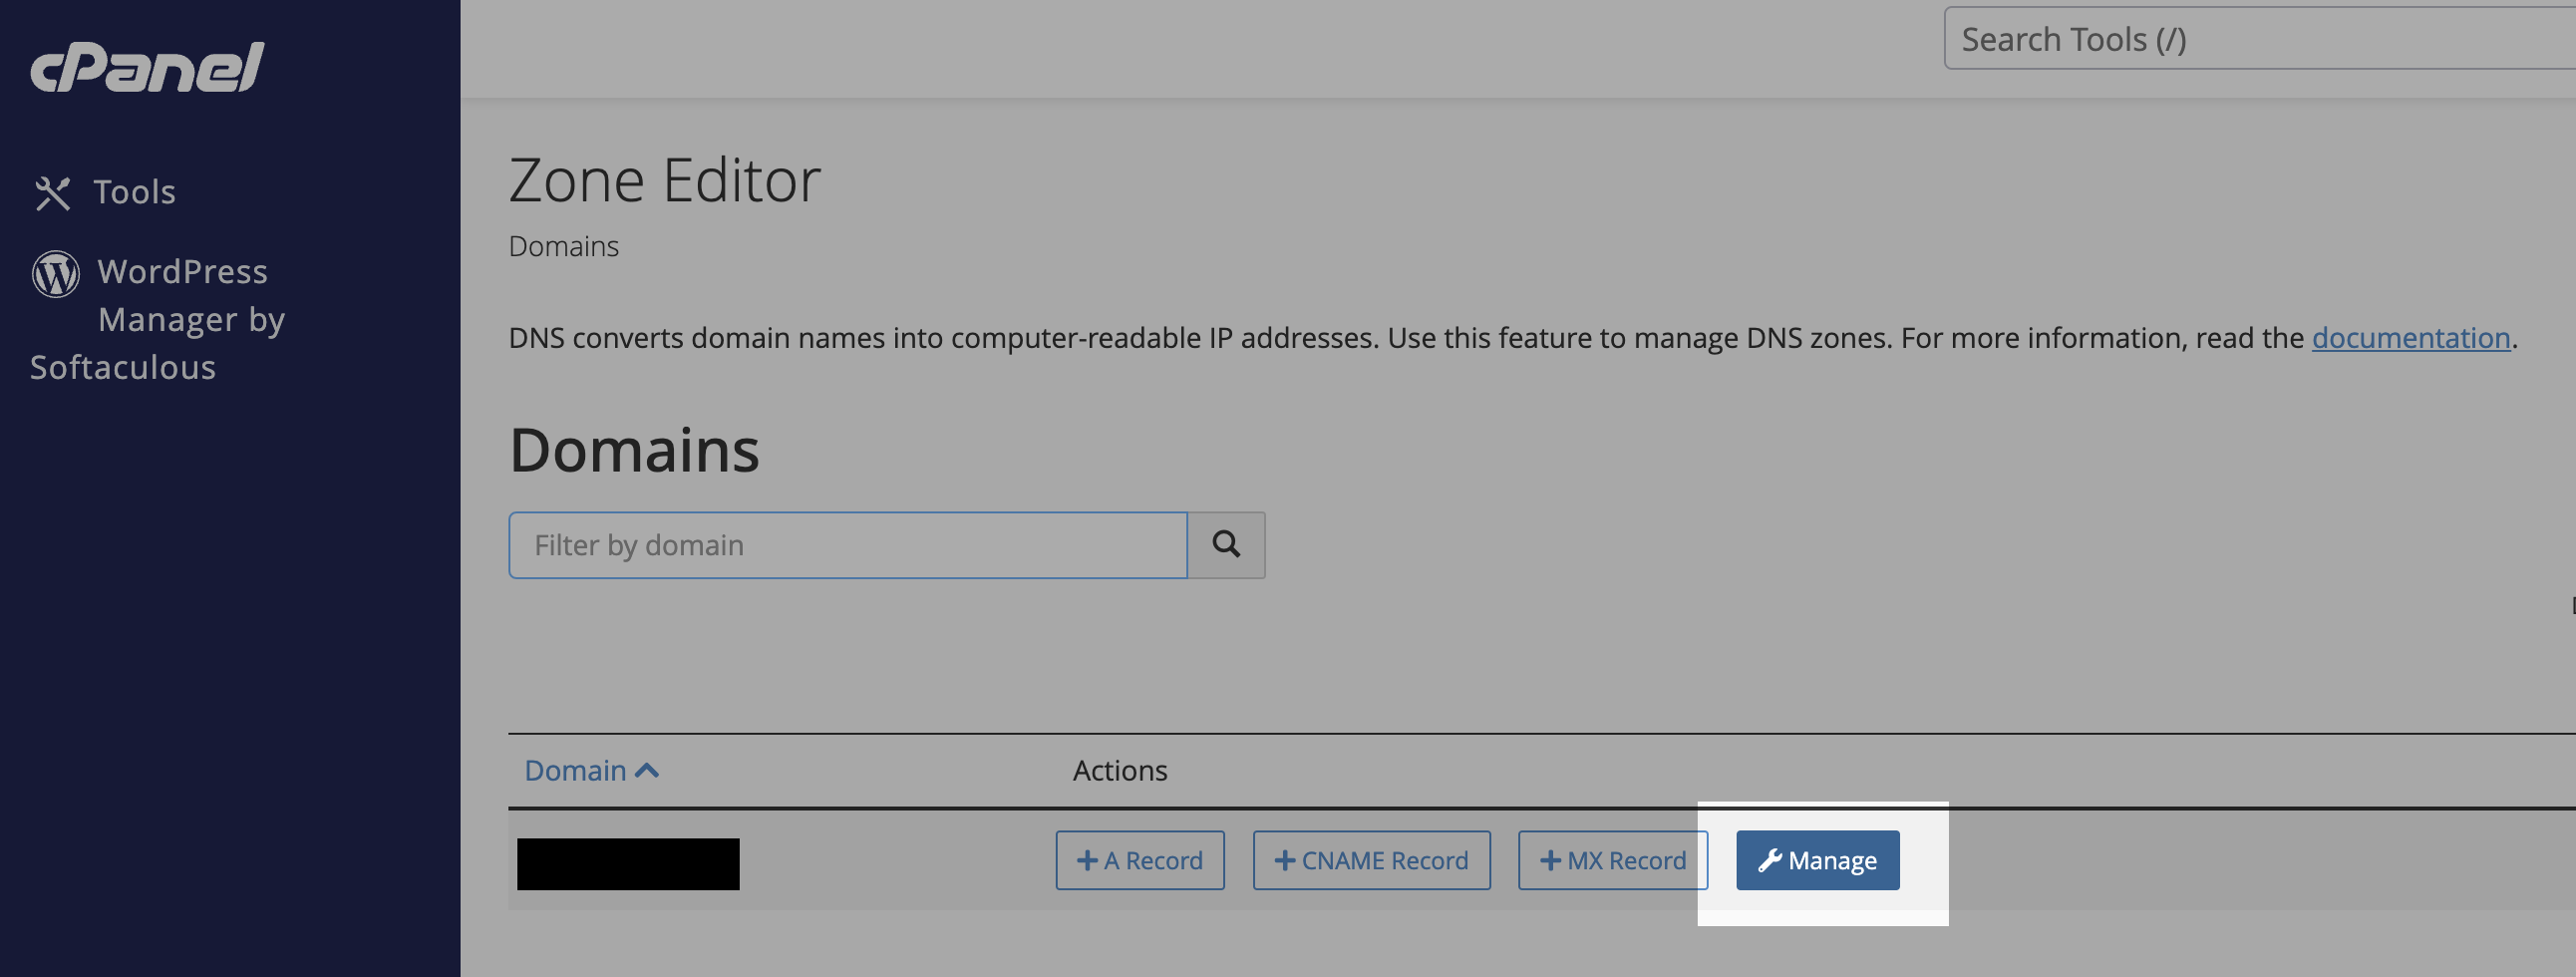
- Add a DNS Record
- Click on the “Add Record” button.
- Enter the domain for the record. For example
mydomain.comorsubdomain.mydomain.com. - Select the type of record you want to add (e.g., A, CNAME, MX, TXT).
- Enter the value for the record. For example, the IP address for an A record, the target for a CNAME record, or the mail server for an MX record.
- Click on the “Save Record” button to save the changes.